“The Greatest Teacher, Failure Is.”
Part Three
Part Three
Greetings! And welcome to Part Tre of my little Palpatine experiment! Below, you’ll find a pair of batreps that basically talk through my matches and my decision-making. Each batrep will be followed by some analysis, as well as some thoughts from my opponent. At the end of this piece, you’ll find version 1.2 of my fleet as it evolved (and why!) based on my matches. The batreps are a bit involved just because I wanted to give everyone as full a picture as I could. But if you’re mainly just interested in the debrief or in how my list evolved, feel free to just scroll on through to the end of each batrep. Happy reading!
Palpatine v.1.1 - Versus Sato (Match 3)
Ted outbid me 399-400, and chose to go first. He chose Rift Assault.
Deployment: I am outdeployed 8 to 6; I am outactivated 5-3. I split up my fleet again in an attempt to leverage the objective and objective tokens against Ted, as well as force a choice between Ted also splitting up his fleet, or committing to the Quasar, or committing to the Cymoon. I believe I am spread too thinly, but I’ve never played this objective before, and it’s hard to tell how the squadron battle will go.
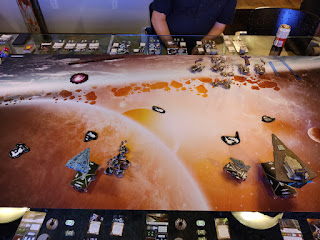
Round 1: I set my Quasar to Navigation and then Squadrons, anticipating that I will not only need to speed up, but then won’t be able to move Squadrons round 3 when they've outkicked my coverage. So my Cymoon is starting with Con Fire (to fuel IF!), Navigate, and then anticipating the need to throw Squadrons in turn 3. My Arq is dialed up with 2 Navigate dials because it’ll need to really dance to be more aggressive than my past two games. All of his ships are now focused on killing my Cymoon, which will likely take a beating if not outright be destroyed. But it means my Quasar is, for the moment, safe. Additionally, the Cymoon is easily at distance 1 of obstacles, whereas his ships are nowhere near obstacles. So Rift Assault is something I can take advantage of next turn, and he cannot. However, my Arq did not quite get within distance 1 of the obstacle that I thought it could. That was disappointing. Squadrons all move into position. All of his aces move into the front of my Cymoon, and his two generic A-Wings move toward engaging my squadron screen. All of my squadrons move as far as they can at the end of Boosted Comms range so my Cymoon only has to weather one full turn of Ted’s squadrons harassing it.
Round 2: At the top of the ship phase, Ted burns a token for IF! And activates Han, who attacks the front of the Cymoon and does 2 damage (which I Redirect to the outside). I burn a CF token for IF! and Palpatine calls out Evade (as the Cymoon has range to all of Ted’s ships, and each of his ships have a single Evade token). Ted activates his Scout Hammerhead with a Con Fire dial, which he takes. Hammerhead hits for 3, which I Redirect to the other side. My Quasar activates and throws Vader alongside 3 Phantoms. Their range is a little limited, but 2 Phantoms pile on an A-Wing and can’t kill it after Vader and 1 Phantom get Shara down to 1 hull and two exhausted defense tokens. I should be able to get Shara to burn the Scatter, and then the Brace becomes meaningless. The Quasar had no shots and pulled ahead at speed 2. The next dial is Navigate to slow down and turn, so I really need to make sure I’m in Squadron range for turn 4. The Pelta activated and threw Dash and Dutch at Vader, killing him after Shara’s Counter. I had planned on Vader being around next turn, but it’s not the worst thing. The Pelta throws 2 black dice, does 2 damage, and I burn a Redirect as my shields are quickly evaporating and I’m not ready to exhaust my Brace yet, given that he still has his Torpedo Hammerhead and Salvation. Arq went all in on the Hammerhead and dealt decent damage, as well as scored an objective token and forced him to burn his Evade (Palpatine) as well as his Redirect. But I couldn’t turn in quite enough to obstruct the Hammerhead’s shot to the Cymoon. So the Arq just moved into a close range double arc shot (within distance 1 of an obstacle) to bait the Hammerhead, and it worked. The Hammerhead (with a Con Fire dial) threw garbage dice and only managed 3 damage with no APTs. Cymoon threw damage out the side at the Torpedo Hammerhead, and then 6 to the Scout Hammerhead. A really tough choice with an Accuracy in there, and I decided to lock down the Evade. It means Palpatine doesn’t affect him, but he’s going to be in close range anyway. I didn’t want to lose damage to a possible reroll, so, I’m not sure it was the right move with Palpatine specifically, but it’s probably what I would have done without him. Cymoon rammed the Pelta and JUST barely landed on the nearby asteroid (literally a hair of the base), and drew into Thruster Fissure. Not particularly bad, but not thrilled about eating the damage. Salvation activated next and did minimal damage to the Cymoon, but hit the Arq decently hard out of the side arc. It jumped to speed 3 with the intention of evading the Cymoon’s front arc, but failing to make it. This is basically the best I could have hoped for, because he cannot now activate in any ideal order with so many ships threatened. His A-Wings killed a Phantom, Shara did a damage to the Cymoon’s hull.
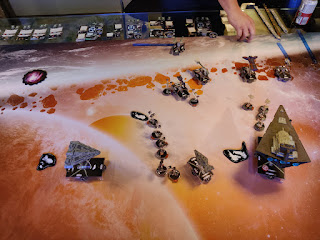
Round 3: Top of the ship phase, Ted burned IF! and Han activated to attack the Cymoon for 2 damage, which I Brace down to 1. I burn IF! because I don’t think the Cymoon will survive the round (I have a Con Fire token from last round, courtesy of Veteran Captain and will take the reroll just in case red dice misbehave), and Palpatine calls out Brace. Salvation did fantastic damage to the Cymoon. The Cymoon is down to 1 hull after a Salvation ram and now must activate first. I don’t love it, and my deployment was definitely in error. Cymoon activates with a Squadron command - Phantom does one damage to Han, other Phantom does 2 damage to the Hammerhead, but Tempest is just out of range (bad play on my part; I could’ve ended two Hammerheads in one go). Cymoon takes a BIG shot on the Pelta for 9 with crit, burning its brace (courtesy of Palpatine) and stripping both its port and front shields, and then evaporates the Scout Hammerhead. It rams the Pelta and explodes. Garel’s Honor does 1 damage to the Quasar, then rams it and explodes, dealing 1 faceup to the Quasar (Disengaged Fire Control). Arq activates and takes a stupid shot at the side of Salvation instead of taking the obstructed shot at the Pelta to force more bad defense token decisions. It forces a Palpatine Brace burn from Salvation and lands a damage on the shields. It then hits Bright Hope for one damage and a victory token, then rams Bright Hope. Pelta activated and used squadrons to kill a Phantom, took a shot at the Arq which Evaded at long range. Then the Quasar activated and shot Salvation for some damage and moved. Bright Hope did damage to the Arq and jumped it. Then in the squadron phase, an A-Wing rolled and killed the Arq.
Round 4: Top of the ship phase, Han activates and attacks the Quasar. The Pelta goes and activates squadrons, killing my remaining Phantoms and using Dutch to activate Tempest. It shoots at Quasar and then moves. It can’t quite get behind the debris field, and so my Quasar gets a side shot at the Pelta and a front shot on Salvation. Rolls into what it needs with the Con Fire dial (I assumed my squadrons would be dead or useless by this time and just needed extra damage from the unassuming Quasar) to kill Salvation. It strips the Pelta’s remaining shields and then zooms at speed 3 out of range of his combat flotilla.
Round 5: Top of the ship phase, Han activates and hits the Quasar. His Pelta goes and activates some squadrons, killing Tempest (my last squadron) and doing a little damage to the Quasar on its way out. My Quasar activates with a Con Fire dial, uses it to score an objective token off the Pelta, then flaks out the front and turns out to run, as I’m not going to get another shot at the Pelta.
Round 6: Top of the ship phase, Han activates and hits the Quasar. Only a couple of other squadrons can hit the Quasar, but can’t do enough damage to kill it (and the Pelta is beyond long range, and did not have range to command Dutch). The Quasar activates and takes a rear shot with Con Fire at Bright Hope in order to score a fifth Rift Assault token. It then rabbited, as it couldn’t kill anything else. At continued speed 3, it eluded the combat GR75 and the match ended. Ted won, 331-210 (he scored 1 RA token to my 5); MOV of 121 points (7-4). I should have gotten tabled, so the fact that I didn’t is huge. My Quasar II is the only reason I was able to narrow the margin that much, despite my ill-advised deployment.
What Did Palpatine Provide?
He forced the Torpedo Corvette to burn its Evade on my Arq attack, which made it an easier target for my Cymoon at medium range. I could have forced the Scout Hammerhead to burn the Evade for Palpatine as well, but I decided that maximizing my damage was more important so the Cymoon could kill it the next turn.
In round 3, the Pelta absolutely had to burn its Brace on a massive, 9 damage shot from the Cymoon. This meant the Pelta could not afford to slow down to try and kill the Quasar; it absolutely had to avoid getting shot, which meant he ran, which meant my Quasar survived, as the Pelta ran as hard as it could away from the conflict at the end of the match.
Also in round 3, Salvation had to burn a Brace simply to prevent 1 damage, which was huge, as it turns out. In round 4, the Quasar Con Fires into Salvation’s side at close range. The Evade is meaningless, but I only rolled one Accuracy. If Palpatine hadn’t eliminated that Brace from beyond the grave in the previous round, Salvation easily Braces the damage, the Quasar rams it, Salvation gets side AND rear arc shots at me, and I get tabled in round 5. And all of his squadrons are exactly where they need to be to crush me. No doubt about it. Palpatine actually, now that I think back on it, saved me from a 9-2 loss in this match between forcing the Pelta to run and getting Salvation killed with a single Accuracy instead of my needing two (that I literally had no way of getting, as I had no rerolls and Salvation was at distance one of an obstacle and so could not be assigned a Rift Assault token).
Was His Impact Worth 35 Points?
As ridiculous as it sounds, yes. My deployment was bad, and I failed to maximize him. I only had him for 3 rounds. I only used him in 2 rounds. In those two rounds he burned 3 tokens, and all 3 of them were meaningful burns - 2 led directly to ship deaths, 1 led to a ship running instead of sticking, which allowed my Quasar to escape the shellacking it so richly deserved. I didn’t deserve to get out of there with less than a 9-2, but Palpatine saved my bad deployment. Motti would not have saved the Cymoon or the Arq; it would have made the Quasar’s escape more likely, but that’s it. And, much like last game, there was maybe one instance in which one of my ships wanted to do two things instead of one and Thrawn would’ve been more helpful. But I never for a moment wished I had a different commander.
What Worked?
Rift Assault. Once again, my objective kept me from falling into a lower MOV bracket. It couldn’t net me a win this time the way that Contested Outpost did in matches 1 and 2 with v.1.0, but it netted me a 7-4 loss instead of a 8-3 loss, and it provided tangible benefits with dice control. The only other red objectives I would consider for this fleet would be Ion Storm (which requires a crit, and as I’m mostly throwing red dice, I don’t want to count on this), Opening Salvo (just about anybody running a Sato, Ackbar, or Romodi fleet, or a fleet dependent on red dice ships, would be THRILLED to see this objective as an option, and I’ve only got 3 ships to take advantage of it - no way; far too easy for this to backfire HARD), or Station Assault (which usually ends up as a wash, and does not give me any tangible benefits such as placing the Gravity Rift, determining where the battle will take place, punishing slow ships, or dice control).
Intensify Firepower! was great. Really let me maximize my use of Rift Assault (despite the fact that he closed fast and close on obstacles intentionally, which incidentally would’ve hobbled Krennic, reinforcing my decision to lose him in v.1.1). And some dice were cold, so it was nice to have that as backup.
Veteran Gunners did what I needed it to do - it gave me options with small dice pools, so mathematical tabulations and considerations were very easy to make. My choices to reroll were very informed and I never regretted any rerolls I made.
What Didn’t Work?
My squadron play was atrocious, due in part to my decision to split my fleet as widely as I did. Sure, it saved my Quasar and saved a tabling, because he either had to commit to the Cymoon with his entire fleet or not. But I isolated my Cymoon too much, and though my squadrons got there early, they didn’t have the impact they needed to have. They didn’t kill a single squadron or land much damage on a single ship target. Dice were fine (in fact, Vader’s 1 roll was fantastic and he nearly one-shotted Shara!); it was 100% user error.
Kallus was a threat this time, but again, my dividing up the fleet meant that I didn’t flak when it was particularly meaningful. This comes back to user error rather than Kallus being a poor fit, in my opinion.
Changes?
None at this time, as this is my 3rd match with this fleet archetype, and my 1st match with this specific iteration. Ted suggested replacing one Phantom with Saber Squadron to free up points so I could bring back Varnillian on my Quasar instead of Veteran Gunners. It’s an interesting thought, but I really didn’t miss Varnillian in this match at all. Sure, she’d have been nice. But she definitely wasn’t needed. Additionally, Saber does not pose a threat at all to ships if I’ve eliminated squadron opposition or if my opponent is flying squadronless.
Palpatine v.1.1 - Versus Ackbar (Match 4)
Kyle outbid me 399-400, and chose to go second. I chose Solar Corona (eschewing Surprise Attack and Contested Outpost).
Deployment: I have Kyle outdeployed 6-5, but we’re effectively even, owing to my deploying first. We each have 3 activations. Surprise Attack was never on the table for me as a choice because I don’t have a good way of dealing with Raid tokens. I struggled between Contested Outpost and Solar Corona because I didn’t want to hand over 120 points and choice of battle field, but I don’t really love my deployment against an ideally deployed Ackbar fleet, courtesy of Solar Corona. I was planning on deploying centrally, but the obstacles on my right made me rethink the strategy because I feared running over them if he deployed to his left/my right and now I had to turn in that direction. So I ended up in a corner. After he deployed, my initial thought is to run my squadrons at the Assault Frigate deployed to the left of my Cymoon heading straight toward me and let them do that work with the Quasar, while my Cymoon and Arquitens worry about the other two assault frigates (including the one sporting Ackbar running along the back edge).

Round 1: My Arquitens started by banking an Engineering token and scooting forward at speed 1. My Quasar banked a Squadrons token and then started banking left to deal with the far Assault Frigate if possible. His Assault Frigates are all starting to bank to my left, his right. So I may need to adjust a bit. My Cymoon is heading straight into overlapping fields of fire, which I hate. But I am fairly certain I will not be able to cut off his Assault Frigates, so I might as well fly straight, buzz them for as much damage as I can, and then run hard, fast, and far.

Round 2: My Arquitens started turning in, knowing from past experiences that if it’s not throwing dice, it will be extremely difficult (if not impossible) for me to win the battle. And its absence from the fight also means I’m certainly not leveraging Palpatine. I chose to have my Cymoon plunge straight ahead given what I decided last round about throwing dice and buzzing by instead of trying to futilely stay in the fight. I wish I had dialed up Squadrons on my Quasar, but I have a Navigation dial instead. I took the token because I saw no reason to bump up to speed 2 this round. This may create issues with activation order (forcing the Cymoon to activate before the Quasar, lest the Quasar bump), as well as letting his YT-2400s get the jump on my squadrons. The former isn’t necessarily the worst thing in the world, but I don’t need to hand my opponent free money. The latter end up being dice dependent. But if dice break his way and my squadrons get fried more quickly than I expect, I’m in a real hole. I’ve learned that my specific squadrons are very effective when combined with Palpatine, but I also rely on them to do some heavy lifting. Without them, I’ve got 2 combat ships and a carrier with some teeth, which isn’t going to win me any fights.

Round 3: At the top of the ship phase, my Cymoon burns a Con Fire token for IF, and Palpatine calls out Evade. My Cymoon activates first (and discards Veteran Captain after revealing a Navigate dial in order to gain a Con Fire token) and lands 4 damage with an Accuracy on the lead Assault Frigate. ECM lets him Brace and Redirect it. 5 damage and an Accuracy on the second Assault Frigate. He burns the Evade (which he didn’t much care about doing in order to eliminate the 2 damage die), uses ECM to Brace, and then Redirects the damage to the front. Cymoon accelerated to speed 3 and banked right in order to focus down on Ackbar. Managed to stay out of medium range of his lead assault frigate. Good roll from the lead Assault Frigate to land 4 damage on the Cymoon, lock down the Brace, and Intel Officer my Contain after shooting my rear arc. I burn the Contain to take one facedown damage instead of a faceup (in case it’s something crippling that drains my shields or something). My Cymoon is still planning on running away, so I’d rather burn the Contain and make sure I can run than save it and discover that doomed me owing to a bad crit (I will circle back to see what that crit was just for posterity’s sake….POST-MATCH: it was Faulty Countermeasures, which would’ve been absolutely devastating). Quasar activates 5 squadrons, but cannot fire flak. Phantoms, Tempest, and Vader (who rolls fantastically!) kill 2 YT-2400s, allowing one Phantom to attack the lead Assault Frigate, landing one damage (he chose not to burn any defense tokens on this attack). The Quasar then moves at speed 1 onto the station with the intention of covering the Cymoon’s flank from the lead Assault Frigate. His second Assault Frigate rolls poorly, but does force my Cymoon to burn a healthy Redirect in order to save a single shield on the port side. The Arquitens doesn’t have any shots, so it jumps up to speed 3 in order to cut off and pincer Ackbar’s Assault Frigate. His Ackbar AF takes a big shot on the Cymoon and forces me to burn my remaining defense tokens. He lands 2 damage on my hull including a crit, with me drawing Targeter Disruptor (not bad at all, given I don’t care about crit effects with the Cymoon so much), then lands in front of my Arquitens and my Cymoon. One of his YT-2400 fails to hit my Phantom, the other lands a damage on the Cymoon’s hull.

Round 4: At the top of the ship phase, my Cymoon burns a Con Fire token for IF, and Palpatine calls out Brace. Top of the round, my Cymoon shifts some shields around using an Engineering dial, then hits Ackbar for 8 damage with crit, but no Accuracies. He burned the Brace (per Palpatine), then Redirected the remaining 4 damage. The Cymoon then threw some damage at the Assault Frigate who had burned his Evade earlier, and attempted to run to the right. Ackbar landed 5 damage and a Ruptured Engine on the Cymoon (who is likely to die this turn, unfortunately). He then landed a monster shot from his front onto the Quasar’s front for 6 damage, with crit, and Intel Officer’d my Brace, which I burned to knock down to 3, and then Redirected 1 to my side. Quasar activates. Vader and a Phantom kill a YT-2400, freeing a Phantom, who hits Ackbar for 3 damage (he has an Evade, which is useless, and an exhausted Redirect, which he burns). Tempest deals one damage to the front of Ackbar, stripping the final shield. Then the Quasar hits the front for 2 damage, no crit. The Quasar then drops to speed zero to ensure he activates squadrons first next round before blowing up. One of the Assault Frigates manages to kill the Cymoon with perfect damage, evaporating it. My Arquitens does two damage to Ackbar’s hull, leaving him at 2 (it should’ve been 3, but I forgot about IF on my black die, as the red rolled a double - so so foolish of me. Especially because I agonized over my “bad luck” because LTT could only affect my red die and not my black. Big, big miss for me that could have really bitten me later...). He drops to speed 2 (Navigate dial) and turns back in. One Phantom does nothing when firing on an AF (obstructed on an asteroid), the other Phantom does 2 damage into an unshielded Assault Frigate’s butt, forcing a Brace burn (Palpatine) and a Redirect burn (it was exhausted). That Assault Frigate is now stripped of defense tokens, which means it’s in danger. It’s possible that Brace was a big Palpatine burn, and the Phantom’s double hit was a bit Redirect burn (2 damage on one die, drew a blank on the other). The remaining YT-2400 flies in and kills the Phantom that just took the big shot on the Assault Frigate (I had debated flying him away to make sure that didn’t happen, but the YT-2400 rolled 4 damage, so it would’ve killed a clean Phantom anyway).
Round 5: Quasar activates squadrons. Tempest rolls hit/crit, killing Ackbar (again, short of this perfect roll, my neglect of using IF! with the Arquitens’ attack last turn really could have cost me so badly). One Phantom does 1 damage to the front of the injured and token-less AF, Vader lands 4 on the remaining YT-2400, and a final Phantom lands 3 damage on the front of the AF, stripping the final shield and landing two damage on the hull. The Quasar fires one shot, dealing one damage to the AF’s hull, facedown, and remains at speed zero. The AF fires back at the Quasar and blanks on the two dice (Ackbar is dead, and the shot was obstructed). It flaks, then moves. The Arquitens has no shots and moves. The remaining AF flaks at Phantoms and moves.
Round 6: Quasar’s squadrons kill the damaged AF (it takes Tempest and all 3 remaining Phantoms), and the Quasar remained at speed zero, sitting outside of the final AF’s range. The Arq did one damage to the YT-2400, then Vader finished it off to end the match.
300-184, my win, 7-4.

What Did Palpatine Provide?
He forced an Evade burn that really didn’t matter much. However, in round 4, he forced a Brace burn with a big Phantom roll that might have made the difference in my killing that damaged AF in the last round. Again, things that are difficult to project. But if he had that Brace for even one more round (and assuming two uses), that’s at least 2 damage he saves. Which means my Quasar has to roll almost exactly what it needs to kill it in round 6 without the aid of IF. There is the possibility that Brace burn made my life easier, and there’s also a possibility that it is what won me the match.
Was His Impact Worth 35 Points?
In this particular match, I’m not sure it was. There was only one token burned because of his effect; it was a big burn, but it was not worth 35 points. However, I would assert user error again in flying too conservatively with my Arquitens, as well as aggressively with my Cymoon. I think the former is more a mistake than the latter, on which I firmly believe when faced with overlapping Ackbar fields of fire and Intel Officers, I made the right choice. However, the right choice also meant I only got to leverage Palpatine’s ability for two turns, and this has happened a couple of times now. I need to get more than 2 rounds out of Palpatine for him to be worth the cost.
What Worked?
Flight Controllers made it almost easy for my Phantoms and Vader to dispatch the YT-2400s before they could do any real damage. In round 3, I was able to eliminate half of his squadrons before they could fire, owing to those extra dice.
Vader REALLY pulled his weight. He killed 3 of the 4 YT-2400s and survived. I was right about my incorrect prioritization of his targets, as well as my being too aggressive with him in the past.
My Phantoms dice, overall, were likely average. But the swings between 1 and 3 damage against ships was big-time. They also did a great job of hammering away at squadrons, and while I didn’t use Cloak as often as I wanted to, I was able to utilize it enough to ensure they’d do the work I wanted them to do.
What Didn’t Work?
The Arquitens. AGAIN. But also, again: user error. I continue to be too conservative with it. I can literally see this mistake after every single match, but for some reason, continue flying it too conservatively. I end up treating it like a deterrent as well as activation padding, and neither is why I placed it in the list in the first place. I can still see it doing work, which is why I refuse to concede this point and will keep it in the fleet until I fly it the way I KNOW I NEED TO IN ORDER TO LEVERAGE PALPATINE. If I fly it better and it still doesn’t pull its weight, then I’ll switch it out for something else. But until the ship fails rather than the pilot, it stays.
There are other cards that “didn’t work,” such as Agent Kallus. But those upgrades were more conditional and it didn’t bother me that they didn’t come into play. I never really felt as though I had a missed opportunity the way I did with Krennic in the original build.
Changes?
I have some ideas on upgrade changes I might shift around, but there’s only one change I’m absolutely making in the wake of this match: moving Palpatine to the Quasar. On paper, he’s far more vulnerable there than on the Cymoon. But in practice, the Cymoon is such a big target (and often an aggressive one!) that I firmly believe Palpatine dies more quickly on the Cymoon than he would on the Quasar.
Other changes I am considering, but am not yet ready to make because they, at present, feel sort of like lateral moves in the context of the current build:
Replace Tempest Squadron with Gamma Squadron. I lose Escort, and 3 blue dice against squadrons. But I gain 3 points, which in turn allows…
...replace Veteran Gunners with Gunnery Chief Varnillian again.
OR! Find the points to replace Tempest with Rhymer (probably by dropping Kallus). This will allow my Phantoms to hit ships at distance 1, then Cloak away. This could well serve two purposes: 1) preventing black flak in the following round, and 2) allow me to maximize leverage of Cloak in the case where my carrier is dead. We all know if we position squadrons well, ships overlap them, and that allows us to "move" squadrons along so they can keep attacking without squadron commands. This is even more feasible and effective with Cloak.
Kyle’s thoughts:
I was too conservative with the Arquitens. He didn’t factor into the battle at all short of throwing a single red and a single black die. If I could win the battle with two ships and my squadrons, couldn’t I improve my position by fighting with the three ships I brought?
We discussed the Arquitens, and how I really need to leverage those dice if I’m going to maximize the use of Palpatine.
Consider deploying the Quasar opposite the Arquitens with the Cymoon in the middle instead of loading them onto one side so that I’ve got guns pointing in all directions.
I don’t always deploy the way you can see in the deployment picture I included earlier in the article, but in this specific matchup (and without the benefit of seeing his deployments first, courtesy of Solar Corona), I was defensive of my Cymoon’s flank because I knew there was a chance I’d have to bolt and I didn’t want my entire fleet all headed in one direction. In retrospect, this is probably a good reason I won the match. Kyle and I discussed how his monster hit on my Quasar from long range scared me into dropping to speed zero so I wouldn’t eat overlapping fields of fire, and might last long enough to toss squadrons for one more round. If I fly even a little closer (speed 1, or God forbid, speed 2 - which I almost assuredly do if he only lands a couple of damage and doesn’t strip my Brace), my Quasar dies, which means I’m no longer pushing squadrons. Not only that, but even if my Phantoms do manage to finish that AF, it’s now a 6-5 win for me with a 37 point MOV instead of a 7-4 with an MOV of 116. That conservative move 100% saved my Quasar, and so I think my deployment worked better than I thought. It did, however, once more mean that I never fired flak. Things to consider…
Anyway! I’ll be back soon with some batreps on v. 1.2, which will feature Palpatine hiding out on my Quasar instead of leading the charge on my Cymoon. We’ll see how it goes! In the meantime, below, find v. 1.2 of my Master and Apprentice fleet.
Master and Apprentice (90/400/400)
==================================
Cymoon 1 Refit (112 + 23: 135)
· Veteran Captain (3)
· Gunnery Team (7)
· Intensify Firepower! (6)
· Linked Turbolaser Towers (7)
Quasar Fire II-class Cruiser-Carrier (61 + 53: 114)
· Emperor Palpatine (35)
· Agent Kallus (3)
· Flight Controllers (6)
· Veteran Gunners (5)
· Boosted Comms (4)
Arquitens-class Light Cruiser (54 + 7: 61)
· Linked Turbolaser Towers (7)
Darth Vader (21)
4 x TIE Phantom Squadron (4 x 14)
Tempest Squadron (13)
Rift Assault
Contested Outpost
Volatile Deposits
-IratePooka

No comments:
Post a Comment